Battery switch on travel trailer function is crucial for managing your RV’s power. Understanding how to use and maintain this essential component is key to preventing electrical issues and ensuring a smooth camping experience. This guide will walk you through the different types of battery switches, safe connection and disconnection procedures, troubleshooting common problems, and best practices for maintenance.
We’ll cover everything from basic functionality and wiring diagrams to advanced topics like integrating your battery switch with solar panels and lithium-ion batteries. Whether you’re a seasoned RVer or a first-timer, this comprehensive guide will equip you with the knowledge to confidently handle your travel trailer’s battery system.
Understanding Battery Switch Functionality in Travel Trailers

Your travel trailer’s battery switch is a crucial component for managing your power sources. It allows you to easily select which battery (or batteries) are providing power to your trailer’s systems, protecting your batteries and preventing accidental drain. Understanding its function and the different types available is key to efficient and safe RVing.
Battery Switch Purpose
The primary purpose of a battery switch is to isolate and control the flow of power from your trailer’s batteries to the 12-volt systems. This allows you to disconnect the house batteries from the trailer’s electrical system when not in use, preventing parasitic drain and extending battery life. It also enables you to choose between using your deep-cycle house batteries, your starting battery (if equipped separately), or both simultaneously.
Types of Battery Switches
Several types of battery switches exist, each offering different levels of control. The most common are the 1-2-Both switches and the 1-2-Off switches. A 1-2-Both switch allows you to select either battery 1, battery 2, or both batteries to power the trailer. A 1-2-Off switch provides the same selection but adds an “Off” position, completely disconnecting both batteries from the trailer’s electrical system.
More complex switches may incorporate additional features like a disconnect for a solar panel charger.
Typical Battery Switch Wiring Diagram
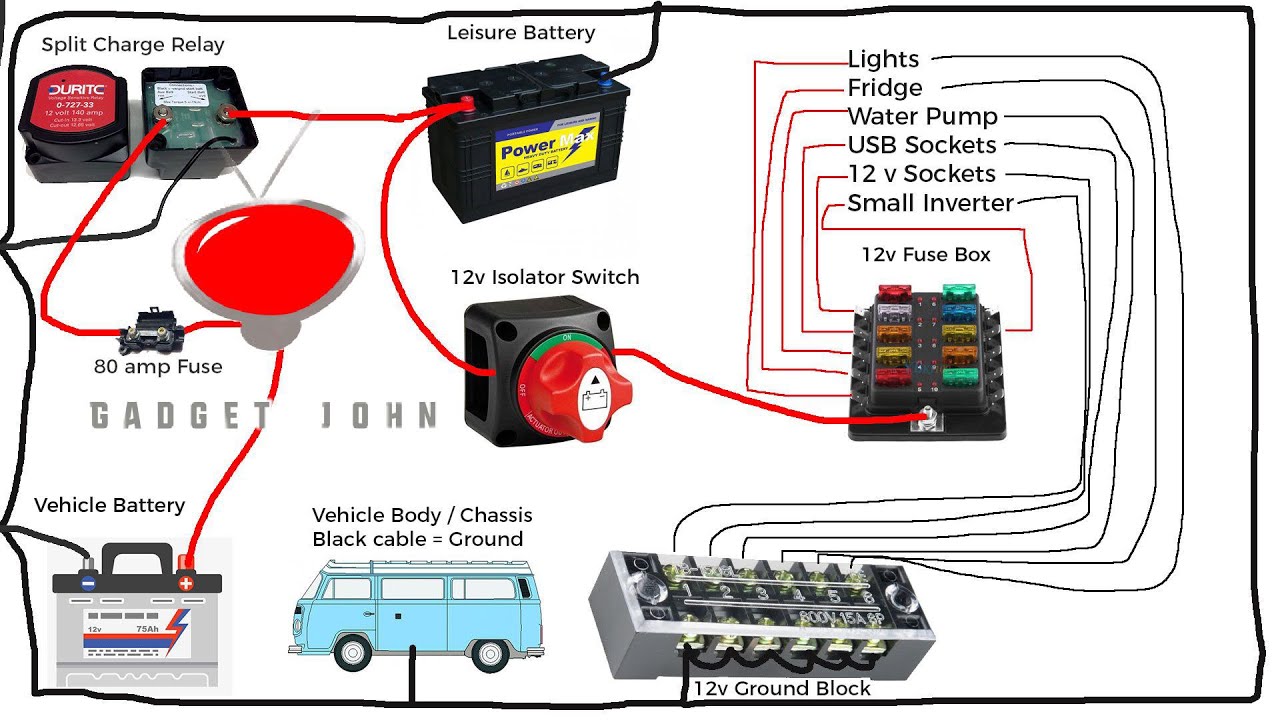
A typical battery switch setup involves two batteries (house and starting, though some trailers only have one), a battery switch, and the 12-volt system wiring of the trailer. The positive (+) cables from each battery connect to the corresponding terminals on the battery switch. The output terminal of the switch then connects to the positive bus bar or distribution point for the trailer’s 12-volt system.
The negative (-) cables from each battery are typically connected directly to the trailer’s chassis (ground) for safety and proper grounding. This setup creates a simple yet effective system for managing battery power. A visual representation would show two batteries, each with a positive cable leading to the switch and a negative cable to the chassis. The switch would have three terminals (or more depending on the type) and an output terminal connecting to the main power distribution.
Comparison of Battery Switch Types
| Feature | 1-2-Both Switch | 1-2-Off Switch |
|---|---|---|
| Number of Positions | Three (1, 2, Both) | Four (1, 2, Both, Off) |
| Complete Battery Isolation | No | Yes |
| Parasitic Drain Prevention | Limited | Excellent |
| Convenience | Simple to use | Slightly more complex |
Battery Switch and Charging Systems
Your travel trailer’s battery switch is the central control point for managing power flow to and from your batteries. Understanding how it interacts with your charging sources is crucial for keeping your batteries healthy and your trailer powered. This section details the relationship between your battery switch and the various ways your batteries get charged.The battery switch acts as a gatekeeper, controlling the path of electricity to and from your batteries.
It determines which power source charges the batteries and which circuits receive power from them. It also protects your batteries from over-discharge or accidental cross-connections. This ensures that your appliances and systems run smoothly and that your batteries last as long as possible.
Battery Switch Operation with Different Charging Sources
The battery switch interacts differently with each charging source: shore power, solar, and the vehicle’s alternator. Shore power, typically 120V AC, is converted to 12V DC by a converter inside your trailer. This DC power then charges your batteries. Solar panels generate DC power directly, which also charges your batteries. Your vehicle’s alternator, when connected, provides another charging source.
The battery switch determines which batteries (or both) receive this charge and which circuits have access to the battery power.
So, you’re planning a trip? Awesome! Don’t forget travel insurance – it’s a lifesaver. Check out Aon travel insurance for comprehensive coverage. They’ve got options for everything from medical emergencies to lost luggage. And if you want another perspective, Aon travel insurance offers a slightly different policy structure, so comparing both is a great idea before you book your flights.
Seriously, peace of mind is worth the investment!
Battery Switch Positions and Charging
Let’s examine how the charging process changes depending on the battery switch position. Most switches have three positions: 1, 2, and BOTH.
- Position 1: In this position, only battery bank 1 is connected to the charging sources (shore power, solar, alternator) and to the trailer’s 12V DC system. Battery bank 2 is isolated.
- Position 2: Here, only battery bank 2 is connected to the charging sources and the 12V DC system. Battery bank 1 is isolated.
- Position BOTH: This position connects both battery banks to the charging sources and the 12V DC system, allowing them to charge simultaneously and share the load. This is generally the best option when both batteries are in use.
It’s important to note that some trailers may have different configurations. Consult your owner’s manual to confirm the specific operation of your battery switch.
Diagram of Electricity Flow
Imagine a simple diagram. We’ll represent the battery switch as a three-way switch.[Diagram Description: The diagram shows three separate charging sources (Shore Power, Solar, Alternator) each connected to a three-way switch labeled “Battery Switch.” Three lines extend from the switch. One line goes to “Battery Bank 1,” another to “Battery Bank 2,” and a third to “12V DC System (Trailer Appliances).” In the first scenario (Switch Position 1), only the line to “Battery Bank 1” and the “12V DC System” is active.
So, you’re planning a trip? Awesome! Don’t forget travel insurance! Check out aon travel insurance for comprehensive coverage. They’ve got various plans, so you can find one that fits your needs and budget. Speaking of options, another great place to look is aon travel insurance ; they often have special deals, especially if you book in advance.
Seriously, getting insured is a total lifesaver – peace of mind is priceless!
In the second scenario (Switch Position 2), only the line to “Battery Bank 2” and the “12V DC System” is active. In the third scenario (Switch Position BOTH), all three lines are active, with power flowing to both battery banks and the trailer’s system. Arrows indicate the direction of electricity flow.]This diagram illustrates how the battery switch directs power from the charging sources to the batteries and to the trailer’s electrical system based on its position.
Understanding this flow is key to properly managing your trailer’s power.
Battery Switch Maintenance and Replacement: Battery Switch On Travel Trailer Function
Keeping your travel trailer’s battery switch in good working order is crucial for reliable power. Regular maintenance prevents problems and extends the lifespan of the switch, saving you from unexpected breakdowns and costly repairs down the road. Neglecting maintenance can lead to corrosion, poor connections, and ultimately, switch failure.Regular maintenance is straightforward and can prevent many issues. This involves visual inspection and cleaning, ensuring all connections are tight and free of corrosion, and occasionally applying a dielectric grease to protect against moisture.
Replacing a faulty switch, while more involved, is a manageable task for those comfortable with basic electrical work.
Battery Switch Maintenance Schedule
A simple visual inspection of your battery switch should be part of your regular pre-trip checklist. At least once a year, and more often if you’re in a particularly humid or salty environment, perform a more thorough inspection and cleaning.
- Monthly Inspection: Visually check for any signs of corrosion, loose connections, or damage to the switch itself. Tighten any loose terminals.
- Annual Inspection and Cleaning: Disconnect the battery switch from the battery and any connected wiring. Use a wire brush to carefully clean any corrosion from the terminals and the switch body. Apply a thin layer of dielectric grease to the terminals to prevent future corrosion. Reconnect the wiring, ensuring all connections are secure.
Replacing a Faulty Battery Switch
If your battery switch is malfunctioning (e.g., not switching properly, showing signs of significant corrosion, or exhibiting excessive heat), replacement is necessary. Before starting, always disconnect the negative battery terminal to prevent accidental short circuits. Safety is paramount.
- Disconnect the Battery: Disconnect the negative (-) battery cable from the battery. This is crucial for safety.
- Remove the Old Switch: Carefully remove the wires connected to the old battery switch. Take photos or make a detailed diagram to remember the wiring configuration before disconnecting. Unscrew and remove the switch from its mounting location.
- Install the New Switch: Mount the new switch in the same location as the old one. Ensure it’s securely fastened.
- Reconnect the Wiring: Connect the wires to the new switch according to your diagram or photos. Double-check your work to ensure all connections are correct. Tighten all terminals securely.
- Reconnect the Battery: Reconnect the negative (-) battery cable to the battery.
- Test the Switch: Test the new switch to ensure it’s functioning correctly. Check that it switches power to your house batteries and the charging system as expected.
Selecting a Replacement Battery Switch
Choosing the right replacement switch is vital. The new switch needs to have the correct amperage rating and the same number of terminals as your old switch. You’ll also want to consider the switch type (e.g., rotary, rocker) and mounting style to ensure a proper fit. It’s always best to find a replacement that matches the specifications of your original switch.
For example, if your old switch was a 100-amp rotary switch, you should replace it with a similarly rated and styled switch. Using a lower amperage switch risks overheating and failure.
Securing and Wiring a New Battery Switch
Properly securing and wiring the new switch is essential for safety and functionality. The switch should be firmly mounted to a stable surface, preventing vibration or movement. All wire connections should be tight and corrosion-resistant. Use appropriate-sized wire nuts or terminals to secure the connections, and apply dielectric grease to protect against corrosion. Ensure all connections are made according to the wiring diagram for your particular system.
Improper wiring can lead to system malfunction or even fire. If you are unsure about any aspect of the wiring, consult a qualified RV technician.
Battery Switch and Different Battery Types
Choosing the right battery type for your travel trailer significantly impacts your battery switch’s functionality and overall system performance. Different battery chemistries have varying voltage outputs, charging requirements, and sensitivities, all of which must be considered when integrating them into your system. This section will explore the compatibility of various battery types with common battery switches.
A standard battery switch is designed primarily for lead-acid batteries. These batteries are relatively inexpensive, readily available, and tolerate some degree of overcharging and discharging better than other types. However, lithium-ion batteries, while offering significant advantages in terms of weight, lifespan, and power density, require a more sophisticated approach to integration with a battery switch.
Lead-Acid Battery Systems with Standard Battery Switches
Lead-acid batteries (flooded, gel-cell, AGM) are compatible with most standard battery switches. These switches are typically designed to handle the voltage and current demands of these batteries. The switch simply isolates or connects the batteries to the trailer’s electrical system, providing a simple on/off control for selecting between house and starting batteries. Regular maintenance, including checking electrolyte levels (for flooded lead-acid) and ensuring proper ventilation, is essential for optimal performance.
Lithium-Ion Battery Systems and Battery Switch Considerations, Battery switch on travel trailer function
Lithium-ion batteries offer higher energy density and longer lifespans than lead-acid batteries. However, they are more sensitive to overcharging and require more sophisticated charging systems to prevent damage. A standard battery switch alone is insufficient for safe and effective use of lithium-ion batteries. The switch might be used to isolate the batteries, but a dedicated Battery Management System (BMS) is crucial.
The BMS monitors voltage, current, and temperature, preventing overcharging, over-discharging, and overheating. Using a standard battery switch with lithium-ion batteries without a BMS could lead to battery damage or even fire. Modifications would include adding a BMS inline between the battery and the switch, and ensuring the charging system is compatible with the lithium-ion battery’s specifications.
Potential Issues with Mismatched Battery Types and Switches
Using the wrong battery type with a standard setup can result in several problems. For example, connecting a lithium-ion battery directly to a system designed for lead-acid batteries, without a BMS, might cause the battery to overcharge, leading to damage or fire. Conversely, using a lead-acid battery in a system designed for lithium-ion batteries with a BMS might not cause immediate damage but could result in suboptimal performance due to the BMS’s attempt to regulate the charging profile of a battery not designed for its parameters.
In essence, the BMS may limit the charging current to a level suitable for lithium-ion, thus limiting the charging rate for the lead-acid battery, resulting in slower charging times. A further issue could be the incompatibility of the charging profiles, where the charging voltage or current provided by the charging system might not be suitable for the connected battery type, leading to undercharging or overcharging.
Mastering your travel trailer’s battery switch is a small step that significantly improves your RVing experience. By understanding its function, performing regular maintenance, and knowing how to troubleshoot common problems, you can avoid frustrating power outages and ensure your appliances work reliably. Remember safety first, always disconnect power before working on your electrical system. Happy travels!
FAQ Compilation
What happens if I leave my battery switch in the “both” position?
Leaving the switch in “both” constantly drains your batteries faster, especially if you’re not using shore power. It’s best to switch to “off” when not using the trailer.
Can I use a different type of battery with my existing switch?
Possibly, but it depends on the switch and battery type. Lithium-ion batteries often require different charging systems and may not be compatible with all switches. Check your switch and battery manufacturer’s specifications.
My battery switch is making clicking noises. What’s wrong?
Clicking often indicates a faulty switch or a low battery voltage. Check your batteries and fuses. If the problem persists, replace the switch.
How often should I inspect my battery switch and connections?
At least once a year, or more frequently if you use your trailer extensively. Check for corrosion, loose connections, and signs of damage.
